
According to NFPA(https://www.nfpa.org/education-and-research/home-fire-safety/electrical-safety-in-the-home), from 2019–2023, electrical wiring and lighting equipment caused an average of 31,647 home structure fires annually, resulting in $1.6B in damages. So it’s important to ensure safe installation around wires and studs. This article provides seven professional tips for installing medicine cabinets with mirrors to help B2B professionals avoid common mistakes and achieve safety, efficiency, and beauty.
1. Understand the Types of Medicine Cabinets With Mirrors
There are 3 main differences between “Surface-Mounted” and “Recessed” medicine cabinets:
1.1. Installation method of Medicine Cabinet For Bathroom
Surface-Mounted: Installed on the wall surface, no need to cut the gypsum board, directly fixed to the wall by screws or other fixings, no need to make too many modifications to the wall. Suitable for solid walls or situations where the spacing between wall columns is not suitable for recessed installation.
Recessed: Recessed medicine cabinets with mirrors require a space of appropriate size to be pre-cut on the wall and the medicine cabinet is embedded in the wall for installation. The installation process is relatively complicated and requires the installer to have certain construction skills and professional tools.
1.2. Space occupation
Surface-Mounted: The medicine cabinet is installed on the wall surface and will extend part of the indoor space, so it will protrude from the wall, which may have a certain impact on bathrooms with smaller spaces.
Recessed: Embedded wall installation, flush with the wall, does not protrude into the room, and basically does not occupy additional space in the bathroom. It is especially suitable for bathrooms with limited space, such as student apartment projects.
1.3. Aesthetics
Surface-Mounted: It stands out from the wall and is relatively independent in visual effect, but may not be integrated with the overall decoration style.
Recessed: It is flush with the wall, has better integrity, and can be better integrated with the overall decoration style of the bathroom, making the bathroom look more beautiful and unified.
Comparison of “Surface-Mounted” and “Recessed” medicine cabinets with mirrors
| Comparison Items | Surface-Mounted | Recessed |
| Installation | Simple, on-wall, little wall work | Complex, requires wall cut-out |
| Space Use | Protrudes, takes space | Embedded, minimal extra space |
| Aesthetics | Less integrated | Better integrated |
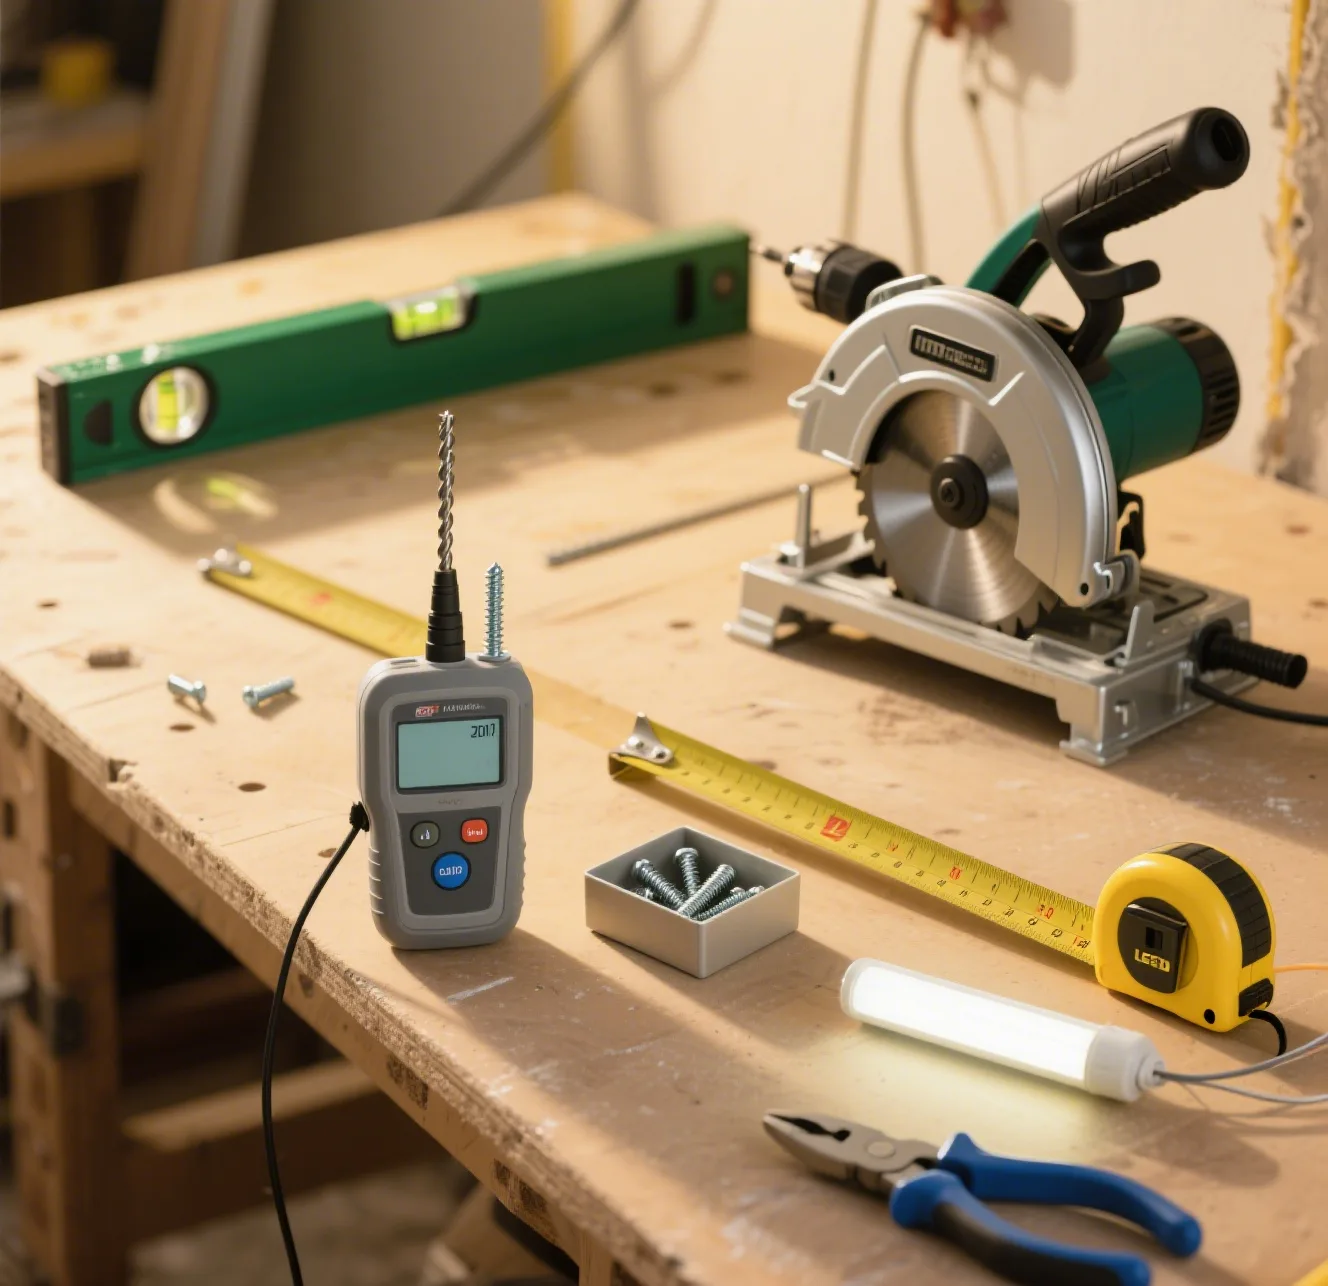
2. Tools & Preparation Before Installation
| Tool Name | Purpose |
| Stud Finder | Locate wall studs |
| Tape Measure | Check cabinet and cutout size |
| Level | Ensure cabinet is aligned |
| Drywall Saw | Cut wall opening |
| Drill + Screws | Fix cabinet into wall studs |
| Wire Cutter (for LED models) | Connect or disconnect power lines |
3. Step-by-Step Recessed Medicine Cabinets With Mirrors Installation
| Step | Description |
| Step 1 | Measure cabinet and mark wall opening |
| Step 2 | Use stud finder to locate wall studs |
| Step 3 | Cut out drywall using saw |
| Step 4 | Insert cabinet and align properly |
| Step 5 | Drill screws into studs for secure mount |
| Step 6 | Reconnect electrical (if LED cabinet) |
| Step 7 | Test functionality, seal edges with caulk |
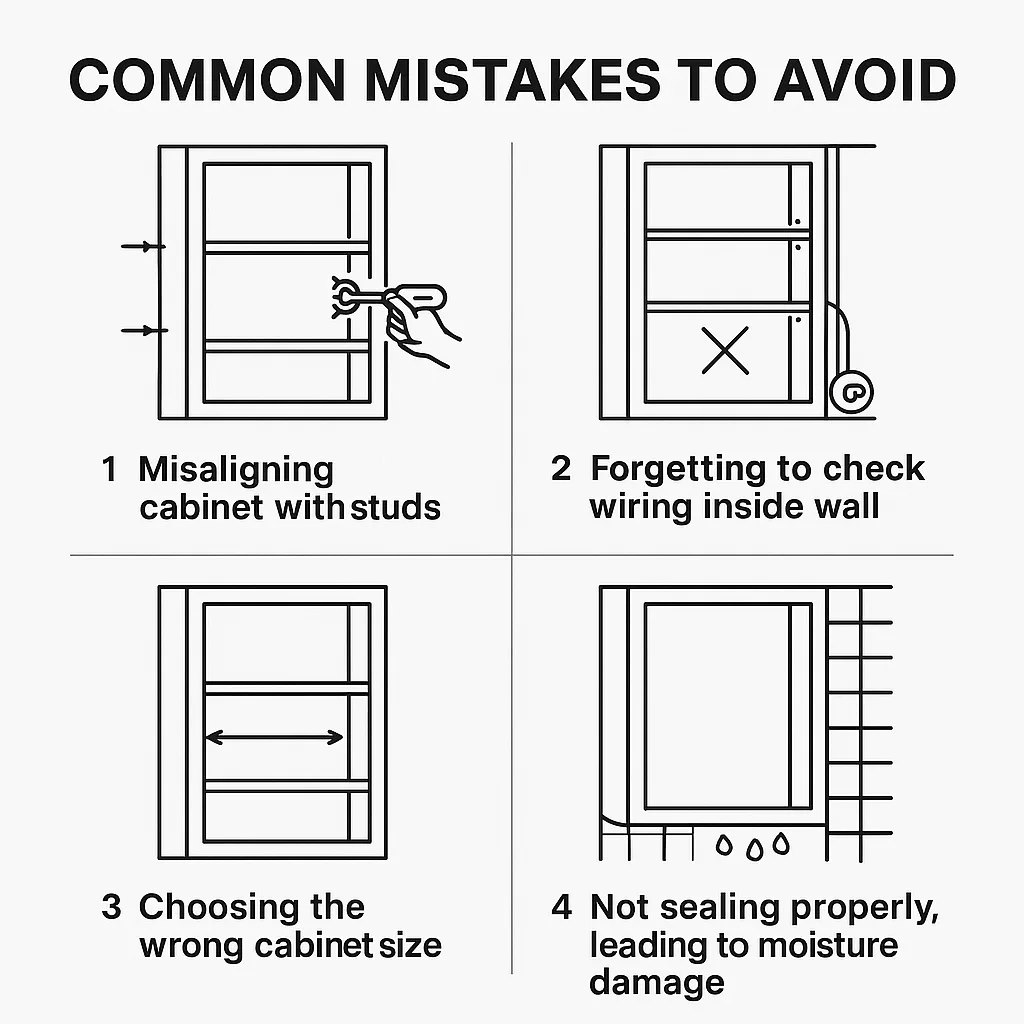
4. Common Mistakes When Installing Recessed Mirror Cabinets – With Pro Fixes
4.1. Misalignment of wall studs
Error: medicine cabinets with mirrors and studs are misaligned
Risk: Mirror cabinet is not installed firmly and is easy to fall off or tilt
✅ Repair suggestions:
Before installation, use a stud finder to accurately locate the wall stud position.
Make sure there is at least one load-bearing stud on both sides of the mirror cabinet for fixing screws.
If there are no suitable studs, the installation firmness can be enhanced by adding additional support beams (skids).
4.2. Ignoring the layout of wall wires and pipes
According to NFPA safety codes, cutting into live wires or plumbing poses fire and flood risks.
Error: Forgetting to check wall wires or pipes
Risk: Cutting wires or damaging pipes during installation will cause safety hazards
✅ Repair suggestions:
Before drilling holes, use a multi-function wall detector (which can detect wires/metal/water pipes) for a comprehensive scan.
The installer should check the original construction drawings of the bathroom or consult a local professional electrician to understand the internal structure of the bathroom wall to avoid secondary damage.
If the wires are dense, it is recommended to use a surface-mounted medicine cabinets with mirrors or adjust the embedded installation position.
4.3. Choosing the wrong mirror cabinet size
Error: Choosing the wrong mirror cabinet size
Risk: The mirror cabinet cannot be embedded, and the installer needs to disassemble the mirror cabinet again and modify the size of the embedded wall.
✅ Recommended repair:
Before installation, the installer needs to accurately measure the width, height and depth of the wall embedding.
Leave at least 1-2 mm of installation margin to avoid damage to the wall edge due to over-tightening.
The installer needs to check the medicine cabinets with mirrors specifications in advance to confirm whether they match the actual opening size.
4.4. Poor sealing leads to moisture damage
The EPA’s Moisture Control Guidance for Building Design, Construction and Maintenance emphasizes that controlling humidity from design to long-term use is essential to ensure structural durability, indoor air quality, and health. Because the humidity in the bathroom is high, improper sealing or poor ventilation can lead to water vapor penetration, mold growth, and material aging.
Risk: Poor sealing of the edge of the medicine cabinet, water vapor penetration, mold growth and expansion, affecting the service life
✅ Professional repair:
After the medicine cabinet is installed, please use mildew-proof silicone sealant (Silicone Sealant) to seal the gap between the medicine cabinet and the wall/tile.
Pay special attention to the sealing of the lower edge to prevent water vapor from splashing in from the basin area.
Keep the bathroom well ventilated. It is recommended to use a defog mirror cabinet or a medicine cabinet with ventilation function.
Therefore, users need to follow the humidity control strategy and targeted sealing technology recommended by the EPA to improve the service life and hygiene level of bathroom equipment.
Moisture Sealing Measures vs. Risks Table
| Sealing Measure | Potential Risk if Omitted | Preventive Effect |
| Use anti-mildew silicone sealant around edges | Water vapor infiltration, mold growth, edge swelling of mirror cabinet | Prevents moisture penetration and material degradation |
| Focus sealing on lower edge (near basin area) | Water splashes cause localized swelling and mildew near cabinet bottom | Shields high-exposure area from basin splashes |
| Ensure complete sealing between wall and cabinet | Accumulated condensation behind cabinet, hidden mold, tile damage | Blocks humid air from entering behind cabinet |
| Choose mirror cabinets with built-in ventilation | Long-term humidity buildup, difficult drying, persistent fogging | Promotes air circulation and surface drying |
| Keep bathroom well-ventilated (fan, window, dehumidifier) | Overall room humidity increases, affecting all wooden or composite surfaces | Maintains ambient humidity level, reduces stress on cabinet sealants |
Aosmay built-in mirror cabinet adopts standard modular size, with high-strength aluminum alloy bracket and moisture-proof back panel design to ensure that it is compatible with conventional wall structures, more stable installation and safer use. We provide complete installation guides and accessory packages for global B-end customers to avoid common mistakes and improve delivery efficiency.
Click to enter the product details page.
5. Tips for Waterproofing and Sealing
Waterproofing and sealing are key steps to ensure that built-in mirror cabinets can be used in humid environments for a long time.
5.1. Choose waterproof backboard material
As a manufacturer, we recommend using moisture-proof multilayer boards or aluminum-plastic composite backboards to resist long-term moisture erosion. High-quality materials are the first line of defense for waterproof sealing and help extend the service life of the product.
5.2. Sealing the edges after installation
At the joints between the mirror cabinet and the wall, be sure to use high-quality anti-mildew silicone sealant to seal the entire frame, especially near the washbasin or shower area. This step can effectively prevent moisture from penetrating the contact surface between the wall and the cabinet.
5.3. Pay attention to the bottom seal integrity
The bottom of the mirror cabinet is the most susceptible to moisture. It is recommended to add a layer of transparent sealing strips or a “V-shaped waterproof groove structure” design at the bottom edge interface to enhance the ability to guide the water flow at the lower edge and reduce the risk of backflow into the cabinet.
5.4. Align and fit the interface with the tile
For walls with tiles, the mirror cabinet should be tightly fitted to the edge of the tile. You can use caulking agent to fill the seams and apply glue to avoid water accumulation and dirt due to uneven gaps.
5.5. Regular inspection and maintenance of the sealing layer
It is recommended that end users check the sealing layer around the medicine cabinets with mirrors every 6-12 months. If bubbling, peeling or mold is found, the glue should be re-applied in time. As a manufacturer, a regular maintenance recommendation table can be included in the manual.
5.6. Waterproof test recommendations (applicable after installation)
After installation, lightly spray water on the sealing edge area to test for leakage. If wet marks are found, re-apply glue. For project customers, it can be used as one of the delivery acceptance links.
Aosmay medicine cabinets with mirrors adopt double-layer moisture-proof backboard and high-density frame structure, combined with professional waterproof edge sealing solution after installation, to effectively cope with the high humidity environment of the bathroom. Our products are particularly suitable for common wall structures in the European and American markets, ensuring both sealing performance and structural stability.
Click to enter the product details page.
6. Post-Installation Checklist
✅ Cabinet is securely fixed
✅ Doors open and close smoothly
✅ No gaps between wall and frame
✅ Electrical parts tested (if any)
✅ Silicone fully dried
7. Maintenance Tips of medicine cabinets with mirrors
| Task | Frequency | Tools Needed |
| Clean mirror surface | Weekly | Glass cleaner, microfiber cloth |
| Check screws/hinges | Monthly | Screwdriver |
| Test LED lighting | Monthly | Switch test |
| Reseal edges (if needed) | Every 6-12 months | Silicone sealant |
8. Summary
Installing a recessed medicine cabinets with mirrors may seem complex, but with the right tools and steps, it’s a manageable DIY or professional task. Always assess your wall structure and plan ahead for long-term durability. For premium LED mirror cabinets with recessed designs, contact Aosmay — your reliable OEM/ODM supplier in China.
If you are interested in medicine cabinets with mirrors, you can read previous articles to learn about industry information.
Exploring Mirror Cabinets: Applications in Various Living Spaces
Enhancing Aesthetics and Durability: Bathroom Mirror Cabinet Surface Treatments